We will look at how you can use C++ to write programs for your Micro:bit, there is an online compiler you use and we will show you how to access this and show a simple program
Process
Visit developer.mbed.org and create an account, its free
Now you nee to add support fo the Micro:bit, to do this you visit the micro:bit platform page and add the micro:bit to your compiler by clicking the “Add to your mbed compiler” button down the right hand side of the page
Open the online idea, select New -> New program. there are 3 sample templates -> select the micro:bit DAL option
Click the Compile button. A hex file will be saved to your computer.
Copy the file to your Micro:bit, the orange LED on the the micro:bit will flash; it will stop flashing when the download is complete.
Your code will be now be running on your Micro:bit
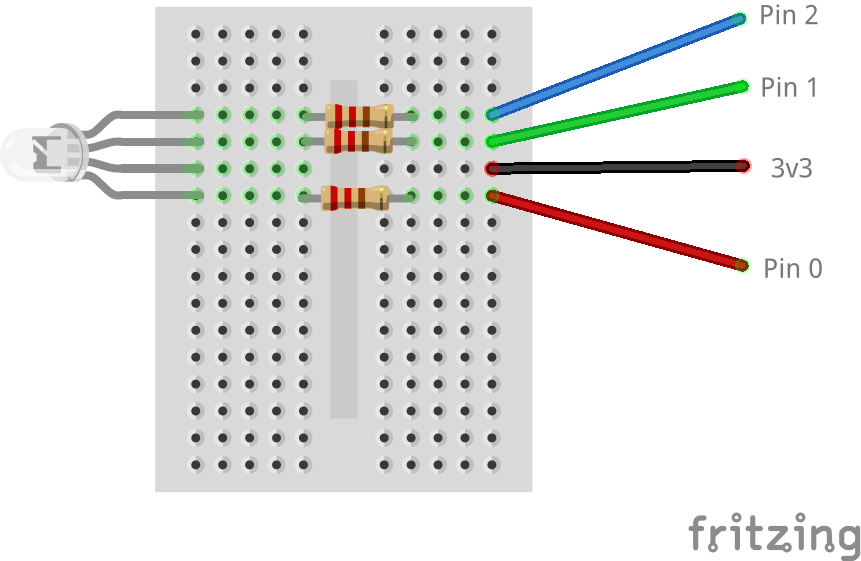
We will now change this to run with the RGB led example
Schematic

Code
Replace the default code with the following, this simply cycles through the RED, Green and blue led’s.
[codesyntax lang=”cpp”]
#include "MicroBit.h"

MicroBit uBit;

int main()
{
    // Initialise the micro:bit runtime.
    uBit.init();

    while(1)
    {
    uBit.io.P0.setDigitalValue(1);
    uBit.io.P1.setDigitalValue(1);
    uBit.io.P2.setDigitalValue(1);

    // red on
    uBit.io.P0.setDigitalValue(0);
    uBit.sleep(1000);
    uBit.io.P0.setDigitalValue(1);
    uBit.sleep(1000);
    // green on
    uBit.io.P1.setDigitalValue(0);
    uBit.sleep(1000);
    uBit.io.P1.setDigitalValue(1);
    uBit.sleep(1000);
    // blue on
    uBit.io.P2.setDigitalValue(0);
    uBit.sleep(1000);
    uBit.io.P2.setDigitalValue(1);
    uBit.sleep(1000);

    }
}
[/codesyntax]
